 |
| Credits |

Tuesday, 29 January 2013
Inspiration: Sweater Sleeved Jackets
Oh I must have one! Since seeing this tutorial on Studs and Pearls (check it out!) I've fallen in love and I must have one! (Did I mention it?)
Monday, 28 January 2013
Tutorial: Bow ties, Glorious Bow ties
I have to say, I love bow ties. It's all Matt Smith's fault really, for exploding bow ties into the world of Doctor Who fans. Aside from that, bows are practically every where nowadays, headbands, necklaces, shoes, you name it.
I decided to sew my own bow tie, the REAL kind you tie on and not the futile clip on. (Although after a couple of failed attempts to tie my bow tie I did CONSIDER making a clip on...) It was a super simple project, and you can use whatever scraps of fabric you have lying around.
MAKE YOUR OWN BOW TIE
Gather your materials. You'll need a pre-existing bow tie that fits you or the person you intend to make the bow tie for (pictured is said bow tie I made a few days ago), OR a template for your bow tie.
(I can't remember where I got my pattern from, but here is a similar one.)

Source some fabric - I'm using this ridiculous Mr. Bean Fabric, which I think is cotton, but any vaguely stiff material should be suitable to make your bow tie (note- chiffon is not your friend when making a bow tie). Grab your sewing machine/needle, and away we go!
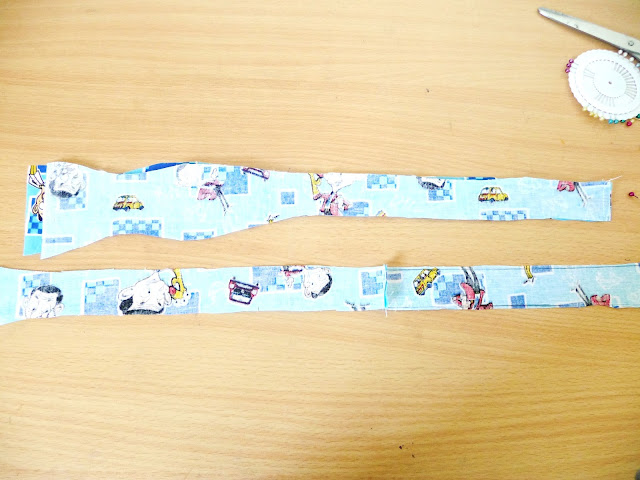
Cut out your pieces. If you are using a template for your bow tie, make sure your measure the neck that plans to become the bow tie's resting place, and correspond this to the neck strap of your bow tie. If you're using another bow tie, be sure to consider the seam allowance (in other words, trace a couple of millimetres extra so you can sew the bow tie into the appropriate shape.)

I cut my bow tie in 4 pieces as my fabric wasn't long enough, but if you have a great deal of fabric you can probably just cut a single strip for each side (2 pieces). If you don't have enough fabric, simply cut the bow tie template out a couple of inches above the 'fish'. You can use ribbon or an odd fabric as the neck strap. I also cut out another 2 pieces of the fabric as interfacing to make the bow tie stiffer and hold it's shape.
If you end up making the bow tie in several pieces, you'll need to sew the ends together to make a continuous strip like so.

Leave about 2 inches (5cm) of space unstitched somewhere along the neck strap (I suggest the middle!) to turn your bow tie inside out.

Turn your bow tie inside out. This is definitely easier said than done. Use a chopstick, or if you aren't as Asian as me, a crochet hook or knitting needle to push the material into shape. Patience is key! The first time I tried this it took well over an hour...mind you I tried to use my own fingers and it DID NOT WORK.

Iron your bow tie and sew up the neck strap.

TYING YOUR BOW TIE
Despite my time at Christchurch Girls' and other occasions where normal ties were standard for performance, I never really got the hang of tying a tie (try say that 5 times fast). After making my first bow tie, I had to of course, learn to tie it.
Don't fret! I failed for about 2 hours watching useless Youtube videos, but I can finally say that with the help of this extremely long video, I finally realised what I was doing wrong.
Hooray!

Good luck with your bow tie tying! Don't be afraid to show of your snazzy bow, I wore my floral one to Remuera Library and it is my pleasure to report everyone looked at me like I was insane. Heh. Well that isn't new.
 |
| Credits |
I decided to sew my own bow tie, the REAL kind you tie on and not the futile clip on. (Although after a couple of failed attempts to tie my bow tie I did CONSIDER making a clip on...) It was a super simple project, and you can use whatever scraps of fabric you have lying around.
MAKE YOUR OWN BOW TIE
Gather your materials. You'll need a pre-existing bow tie that fits you or the person you intend to make the bow tie for (pictured is said bow tie I made a few days ago), OR a template for your bow tie.
(I can't remember where I got my pattern from, but here is a similar one.)

Source some fabric - I'm using this ridiculous Mr. Bean Fabric, which I think is cotton, but any vaguely stiff material should be suitable to make your bow tie (note- chiffon is not your friend when making a bow tie). Grab your sewing machine/needle, and away we go!
Cut out your pieces. If you are using a template for your bow tie, make sure your measure the neck that plans to become the bow tie's resting place, and correspond this to the neck strap of your bow tie. If you're using another bow tie, be sure to consider the seam allowance (in other words, trace a couple of millimetres extra so you can sew the bow tie into the appropriate shape.)

I cut my bow tie in 4 pieces as my fabric wasn't long enough, but if you have a great deal of fabric you can probably just cut a single strip for each side (2 pieces). If you don't have enough fabric, simply cut the bow tie template out a couple of inches above the 'fish'. You can use ribbon or an odd fabric as the neck strap. I also cut out another 2 pieces of the fabric as interfacing to make the bow tie stiffer and hold it's shape.
If you end up making the bow tie in several pieces, you'll need to sew the ends together to make a continuous strip like so.

Pin together and sew your bow tie! Make sure your interfacing is not sandwiched in between the main pieces or else your bow tie will look very odd when you turn it inside out. Instead, lay it on top of the main pieces.

Leave about 2 inches (5cm) of space unstitched somewhere along the neck strap (I suggest the middle!) to turn your bow tie inside out.


Iron your bow tie and sew up the neck strap.

TYING YOUR BOW TIE
Despite my time at Christchurch Girls' and other occasions where normal ties were standard for performance, I never really got the hang of tying a tie (try say that 5 times fast). After making my first bow tie, I had to of course, learn to tie it.
Don't fret! I failed for about 2 hours watching useless Youtube videos, but I can finally say that with the help of this extremely long video, I finally realised what I was doing wrong.
Hooray!

Good luck with your bow tie tying! Don't be afraid to show of your snazzy bow, I wore my floral one to Remuera Library and it is my pleasure to report everyone looked at me like I was insane. Heh. Well that isn't new.
Sunday, 27 January 2013
Project: 12 Dresses
With the school term looming just as I've decided to finally put my DIY plans in place, I thought I'd set a goal to complete one dress a month, or 12 dresses this year. I think it should be reasonable, unless I find the workload sucks the creativity out of my brain (calculus does that to EVERYONE'S brain!)
Additionally, I've set a goal to at least do a small project, or inspiration post a week. I have a feeling it will escalate...
The first dress I've created this year is for my friend Kat (who has kindly offered to model the majority of garments in the coming future). The quality of my camera is terrible, and that of my webcam is even worse, so I fiddled with the pictures on word (yes, because I have no photoshop) to make them more bearable.
I used some floral heavy weight cotton I hijacked from my mother's work and the sleeves of a large white cotton shirt I found at the market for $2. When it comes so sewing I have absolutely no clue what I'm doing (heck, no I mean when it comes to ANYTHING), all I know is that I should try avoid getting stabbed and to press the pedal to get things moving.
For the skirt, I pleated the front with the help of an iron and 20 pins. The front of the dress is constructed out of the sleeves of an XXL shirt that I unpicked from the shirt itself (the torso is being used for another project). The dress fastens in the back/side, I extended the band that goes across the waist and added velcro (this is my newest obsession) so that it cinches in at the waist.
It is an open backed dress, with a giant bow to hide the elastic fastening.

I'd say I'm happy with this dress and though I'ma little reluctant to consider it one of my 12 dresses, January is nearly over! So I haven't got much choice. If I were to make this dress again, I'd simply extend the front part so that the dress sits over the neck.
My next project will have to be super economical because there is absolutely nothing in my wallet at the moment. OH a scraps project! And who doesn't love those?
Additionally, I've set a goal to at least do a small project, or inspiration post a week. I have a feeling it will escalate...
The first dress I've created this year is for my friend Kat (who has kindly offered to model the majority of garments in the coming future). The quality of my camera is terrible, and that of my webcam is even worse, so I fiddled with the pictures on word (yes, because I have no photoshop) to make them more bearable.
 |
| Hooray for my apocalypse like room! And photo quality worthy of the last century. |
For the skirt, I pleated the front with the help of an iron and 20 pins. The front of the dress is constructed out of the sleeves of an XXL shirt that I unpicked from the shirt itself (the torso is being used for another project). The dress fastens in the back/side, I extended the band that goes across the waist and added velcro (this is my newest obsession) so that it cinches in at the waist.
It is an open backed dress, with a giant bow to hide the elastic fastening.

I'd say I'm happy with this dress and though I'ma little reluctant to consider it one of my 12 dresses, January is nearly over! So I haven't got much choice. If I were to make this dress again, I'd simply extend the front part so that the dress sits over the neck.
My next project will have to be super economical because there is absolutely nothing in my wallet at the moment. OH a scraps project! And who doesn't love those?
Saturday, 26 January 2013
I could totally make that!
Hi there!
This blog is for everyone who's fascinated at how I somehow have the magical ability to do 83947398741 different things in my 'spare time'. I always made sure I plan to create something for myself with my time since it's so intensely satisfying.
(That, and the fact that my priorities seriously need a raincheck.)
I'll be posting whatever DIY I come up with, whether it's food (highly unlikely, the food will be gone before I have time to take a photo and also I DO NOT want to fall into that cliche of Asians taking photos of food...), fashuuuuuuun, sewing, crocheting, knitting, home making...the works.
Also! Jessica (kumarachip) will be accompanying me to fill in the days I can't blog. Be nice to her, she's crazier than myself...(if it starts with 'pimp', it's from Jess).
Subscribe to:
Posts (Atom)